
8.2. Site Users and Inviting New Users
User accounts are created and modified from the Site Users button under the Global section of the Setup. You can use this to invite a new user to join the site. The new user will be automatically invited to join the active project. If you are trying to add an existing user to a new project, use the Project Users button not the Site Users button.

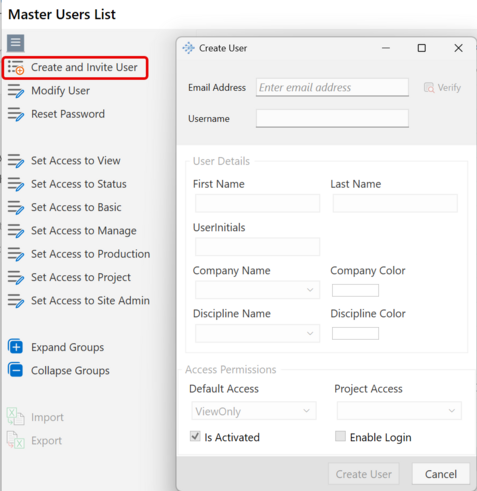
Inviting a New User
Click the Create or Invite User from the left Menu. Fill in the email and username fields. Click the Verify button to double check that this combination of email + username does not exist already. If the combination already exists, you can simply add the user to the project from the Project Users panel. Otherwise, the bottom section of the window will unlock so you can fill in the user information.
If the user belongs to a company that is not yet in your site setup, create the company first then come back to create the user.
|
User Roles
A user can have a Default Access role and a Project Access role. Project access cannot be higher than the default access and you can set up both values from the same window while the user is being created.
If you want to allow the user to login, you should check the enable login button. A email invitation will be sent to the user's email with their credentials, otherwise the new user account will be created but the invite will not go out.
To understand User Accounts and Access Levels follow this link: Accounts and User Roles
|
Modify User
To modify a user, select the user from the list of users list and then click "Modify User". The window will show up allowing you to modify the user's information. You can use this window to also enable the user's login or disable the user's login capability or to modify their default access.
Note: if you increase a user's default access, you will need to manually increase for each projects separately. If you decrease a user's default access, their access in all projects will drop automatically to match their new decreased access.
|
Set Access to [ ] Menus
The set of menus in this section (start with Set Access to X) are intended for batch modifications for a selection of users to change their access in one click. Select the users you wish to modify and then click a menu item from this group.
Expand / Collapse Groups
The user list can be grouped by Company or Discipline. Click and hold the header cell of the Company and drag it to the top gray section of the list to Group by Company. You can now use the expand / collapse buttons to show all groups expanded or collapses or control the groupings individually from the arrow next to the group name.